
A residential security assessment gives you a room-by-room inventory of your home’s weak points, ranked by how likely they are to be exploited and how much damage they’d cause, followed by a written plan for fixing them in order. Most homeowners start by running a quick DIY walkthrough or requesting a free police survey. When your risk profile is higher or you want someone to prioritize and implement the fixes for you, a professional consultation is the next step. Firms like Hub Investigative Group build these plans using CPTED principles, the same framework police departments use.
TL;DR:
- Homeowners should focus on fixing strike-plate screws, deadbolt locks, and exterior lighting first, as these address the most common forced-entry vulnerabilities.
- A professional assessment provides a prioritized, detailed plan rooted in law enforcement principles, and often includes assistance with implementation.
- DIY home security checks can be completed in under an hour by inspecting exterior lighting, locks, sensors, cameras, and social media habits.
- Different residence types require tailored checklists, with apartments emphasizing unit entry points and detached homes controlling their entire perimeter.
- Smart devices expand assessment scope to digital security, involving app authentication, firmware updates, network protection, and camera placement.
Table of Contents
- What Does a Residential Security Assessment Cover?
- How Do You Score Your Own Home Security in an Hour?
- Police Surveys, Alarm Consultations, or a Paid Assessment: Which One Do You Need?
- How Do You Prioritize Fixes Once You Have a List?
- How Do You Schedule an Assessment and Prepare for the Visit?
- Why the Firm Doing Your Assessment Actually Matters
- What Legal and Privacy Issues Come Up During an Assessment?
- Do Apartments and Detached Homes Have Different Vulnerabilities?
- How Do Smart Home Devices Change a Security Assessment?
- How Do You Read a Security Assessment Report Without a Background in Security?
- What Happens After the Assessment Is Done?
- An Editorial Take on What Actually Keeps Homes Safe
- Get a Professional Assessment Without Losing Momentum
- Checklists and Templates Worth Reviewing Yourself
- Sources
What Does a Residential Security Assessment Cover?
Every credible assessment, whether it’s a free police walkthrough or a paid consultation, moves through the same general territory. The order matters: most inspectors start outside and work in, because professional audits typically begin at the exterior and conclude with a prioritized report rather than jumping straight to your alarm panel.
Here’s what gets checked, and why each area earns its place on the list:
- Perimeter: fencing, gates, exterior lighting, whether your house numbers are visible from the street, and whether ladders, patio furniture, or trash bins give someone a boost to a second-floor window.
- Entry points: door slab and frame material, hinge placement, deadbolt throw length, strike-plate screws, sliding-door track locks, and window glazing or secondary locks.
- Electronic security: alarm sensor placement, control panel location, monitoring status, camera angles, and whether your home network itself is secured against intrusion.
- Interior: safe placement, valuables storage, clear escape routes, and working smoke and carbon monoxide detectors tied to an actual emergency plan.
A proper visit ends with a written checklist, supporting photos, and recommendations ranked by urgency, not a verbal “looks fine” on the way out the door.
How Do You Score Your Own Home Security in an Hour?
You don’t need a consultant to find your first ten problems. A residential physical security site-survey template covers the same ground a professional would, just without the professional. Here’s a homeowner version you can run in 30 to 60 minutes.
- Walk the exterior at night. Note every dark stretch near a door, gate, or window. Shadows are where someone waits.
- Test every exterior door’s deadbolt. It should throw at least one inch into the frame.
- Check strike-plate screws. Short screws pull out under a swift kick; three-inch screws anchor into the stud.
- Inspect hinges on exterior-swinging doors. Exposed hinge pins can be tapped out from outside.
- Test window latches and sliding-door tracks. Add security film or a track pin if a window opens with a firm push.
- Check the garage. Confirm the service door locks, the keypad code isn’t a birthday, and power tools aren’t visible through a window.
- Test cameras and sensors. Walk your own approach path and confirm the camera actually captures it, then check that recordings save somewhere you can retrieve them.
- Inventory spare keys. Count who has one, and cancel access for anyone who shouldn’t.
- Review your social media habits. Real-time travel posts are a broadcast invitation.
- Confirm your escape plan. Everyone in the house should know two ways out.
Score each item 1 if it passes, 0 if it doesn’t, then divide your total by 10 and multiply by 100. A high score means routine maintenance. A moderate score means some fixes are needed soon. A lower score indicates that urgent attention is required.
Pro Tip: If you only have time for three fixes tonight, do the strike-plate screws, the deadbolt check, and the exterior lighting. Those three account for a disproportionate share of forced-entry vulnerabilities, and none of them cost more than $20.
Police Surveys, Alarm Consultations, or a Paid Assessment: Which One Do You Need?
Not all “free security check” offers deliver the same thing, and knowing the difference saves you a wasted afternoon.
- Police and CPTED surveys are usually free and educational. Many departments, including programs like the one Lower Merion Township runs, send an officer to walk the property and hand you a checklist with no sales pitch attached.
- Alarm-company consultations are also often free, but the deliverable looks different: the visit is structured to identify gaps their equipment can fill, which makes it useful for verifying an existing system but less useful as a neutral second opinion.
- Paid professional assessments go deeper. You get a full risk analysis, a prioritized plan, and often help to implement it, which matters when the value of what you’re protecting, a documented past incident, or a genuinely complex property justifies the cost.
Decide based on your actual exposure: a starter home with no history of trouble may only need the free route, while a home with high-value assets, a prior break-in, or an unusual layout benefits from the deeper look a 24-hour guard presence or alarm comparison can help you think through.
How Do You Prioritize Fixes Once You Have a List?
Rank each finding by likelihood times impact, not by what feels most urgent in the moment. A dark side yard you pass daily and never notice can rank higher than a rusty back gate you already know needs replacing.
Cost tends to fall into three clean bands:
- Under $50: replacement screws, motion-sensor bulbs, door reinforcement plates, and cutting back shrubs that block sightlines.
- $50 to $500: upgraded deadbolts, motion-activated flood lights, window security film, and a basic camera or two.
- $500 and up: solid-core or steel door replacement, professionally installed camera systems, or a monitored alarm upgrade.
Match cost to timeline. Immediate fixes (days) are the cheap, high-frequency items: screws, bulbs, habits. Short-term fixes (weeks) usually mean ordering and installing new hardware. Longer projects (months) cover structural work like door or window replacement.
The rule that saves homeowners the most money: finish the basics, locks, lighting, and access habits, before signing a monitoring contract or buying a camera system. A risk-scoring framework can help you keep that order straight instead of buying gadgets first and fixing fundamentals later.
How Do You Schedule an Assessment and Prepare for the Visit?
- Find your local crime prevention unit through your police department’s non-emergency line, or search for a licensed security consultant if you want a paid, prioritized plan.
- Prepare before the visit. Write down specific concerns, have keys and access ready, pull up photos of any past incidents, and note anything that’s already changed since you moved in.
- Expect a standard flow. The assessor walks the perimeter, tests locks and any existing electronic systems, then debriefs you with a written checklist and ranked recommendations.
- Ask direct questions. Confirm credentials, CPTED familiarity, insurance and liability coverage, and ask to see a sample report before you commit.
Why the Firm Doing Your Assessment Actually Matters
Not every consultant walking through your home understands the difference between a checklist and a plan. A professional security and investigative firm brings combined law enforcement and loss-prevention experience to residential work, which shows up in the details: tailored risk management instead of a generic form, a prioritized written plan instead of a verbal opinion, and oversight through implementation rather than a one-and-done visit.
Before hiring anyone, confirm four things: verified credentials, active insurance, real CPTED knowledge, and a sample report you can actually read before you pay for one.
What Legal and Privacy Issues Come Up During an Assessment?
An assessor walking your property is documenting it, which raises a few questions worth settling before anyone shows up. Photos taken during a walkthrough, whether by police or a private consultant, should stay tied to your file and your file only. Ask directly how images and notes are stored, who can access them, and how long they’re retained.
Camera placement carries its own legal weight. Cameras aimed at your own entry points and yard are standard practice, but a lens that captures a neighbor’s windows or backyard can create a real dispute, and in some jurisdictions a legal one. A competent assessor will flag any camera angle that crosses a property line before recommending it.
If you rent rather than own, get your landlord’s written approval before altering locks, running new wiring, or installing hardwired cameras. Some leases prohibit permanent changes to entry points entirely, and a well-meaning upgrade can become a security deposit dispute.
For any paid assessment, ask what happens to your report and photos after the engagement ends. A credible firm should be willing to state its data-retention practice plainly rather than deflect the question. If an assessor won’t answer directly, that’s worth treating as a finding in itself, alongside the ones on your checklist.
Do Apartments and Detached Homes Have Different Vulnerabilities?
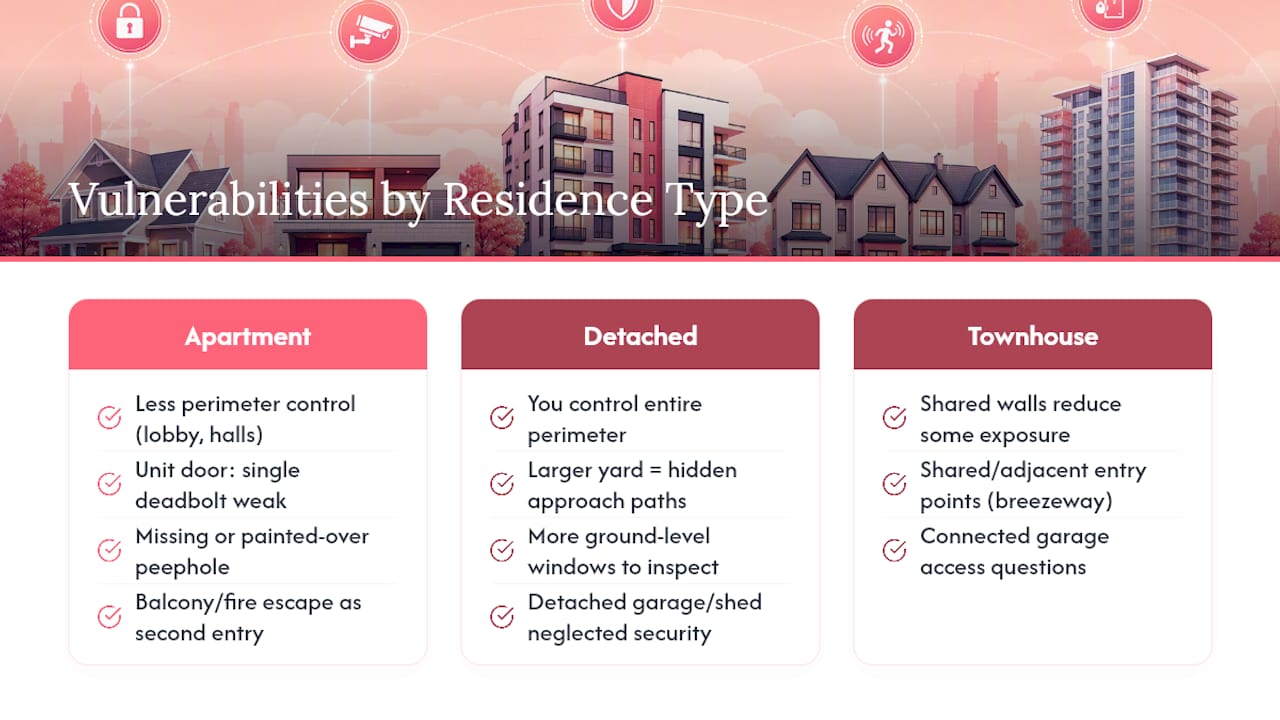
The type of residence you live in changes which vulnerabilities matter most, and a checklist built for a detached house will miss what actually threatens an apartment.
Apartment and condo dwellers usually have less control over the building’s perimeter, hallway lighting, or lobby access, since those fall under a landlord or management company. The real exposure sits closer to the unit door itself: a single deadbolt instead of a reinforced strike plate, a peephole that’s missing or painted over, and a fire escape or balcony that offers a second, unmonitored entry point many residents forget to check.
Detached single-family homes flip that risk profile. You control the entire perimeter, which means more to inspect, but also more you can fix without asking permission. Larger yards mean more hidden approach paths, more windows at ground level, and often a detached garage or shed that gets far less security attention than the front door.
Townhouses and duplexes split the difference. Shared walls limit some exterior exposure, but shared or adjacent entry points, like a common breezeway or connected garage, create access questions a detached home never faces. Whatever your residence type, the fix is the same: apply the checklist to your actual layout rather than assuming a generic list covers your specific risks.
How Do Smart Home Devices Change a Security Assessment?
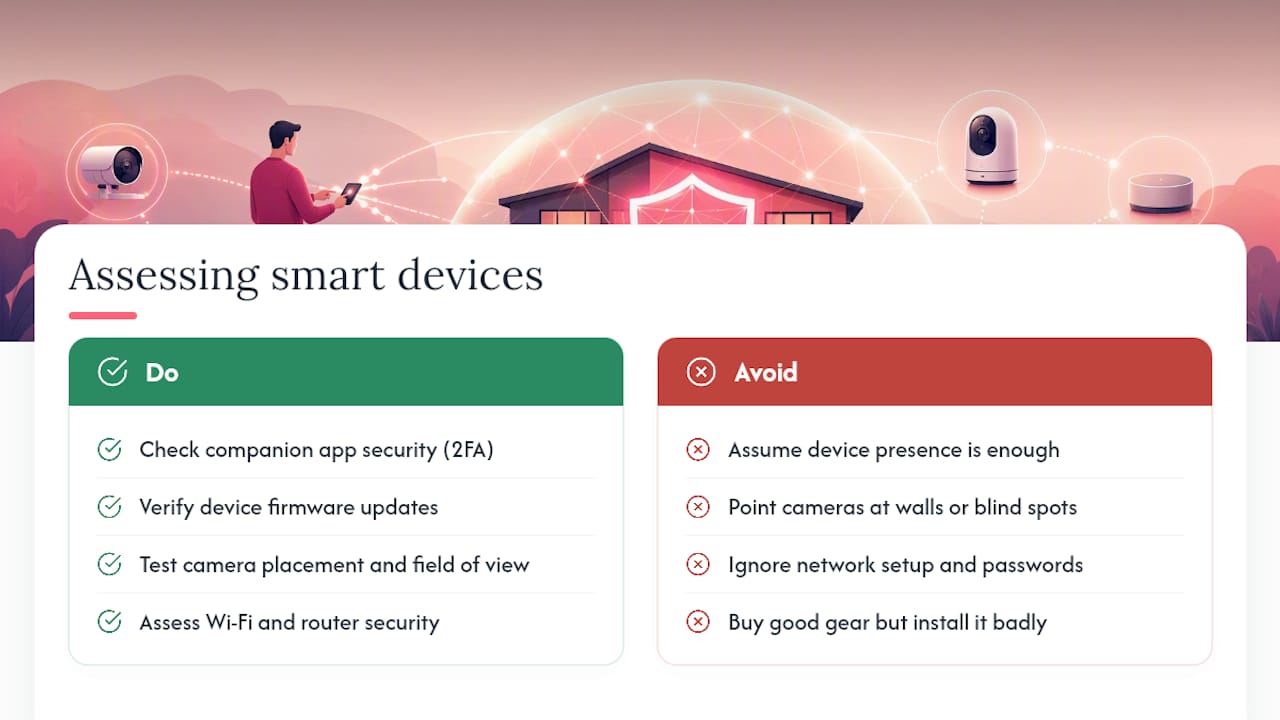
Smart locks, video doorbells, and app-connected cameras have added an entirely new inspection category to what used to be a purely physical walkthrough. An assessor now has to evaluate not just whether a lock is sturdy, but whether its companion app uses two-factor authentication and whether the device receives regular firmware updates.
A camera system is only as good as its placement and its network. Professionals test not just whether a device exists but whether it functions correctly. Does the camera’s field of view actually capture the walkway leading to your door, and does a triggered sensor produce a usable alert rather than a silent failure. A $200 camera aimed at a wall is worse than no camera, because it creates false confidence.
Network security deserves its own line item now. A weak Wi-Fi password or an unsecured router can turn every connected lock and camera in your house into a liability instead of a safeguard. If you’re shopping for new hardware, installers who specialize in home security systems can advise on placement and network setup at the same time, which avoids the common mistake of buying good equipment and installing it badly.
The upside is real: smart devices give you data a purely physical assessment never could, like a log of exactly when a door opened. The tradeoff is a wider attack surface that a thorough assessment now has to account for.
How Do You Read a Security Assessment Report Without a Background in Security?
A written report can look intimidating if you’re not used to the terminology, but most follow the same basic structure once you know what to look for.
Start with the summary or overview, usually at the top. It should state your overall risk level in plain terms before diving into specifics. Next comes the itemized findings, typically organized by area, perimeter, entry points, interior, matching the same scope categories covered earlier in this guide.
The section that matters most is the prioritization. A credible report ranks findings by urgency, not just by location, and should explain why one issue outranks another. If a report lists twenty findings with no ranking at all, that’s a sign the assessor didn’t do the analysis you’re paying for. Photos should accompany specific findings, not just appear as a generic gallery at the end.
Watch for vague language. Phrases like “consider upgrading security” without a specific product, cost estimate, or timeline aren’t recommendations, they’re filler. A useful report tells you exactly what to replace, roughly what it costs, and how soon to act. If anything in the report doesn’t make sense, ask the assessor to walk you through it line by line before you pay the final invoice. A good consultant expects that question and welcomes it.
What Happens After the Assessment Is Done?
The report isn’t the finish line. It’s the start of a maintenance cycle that most homeowners underestimate.
Once you’ve worked through the prioritized list, set a reminder to test everything again, not just visually check it, but actually test it. Walk your camera’s field of view after any landscaping changes. Trigger your alarm sensors after a battery swap. Confirm smart lock firmware updates installed correctly instead of silently failing in the background.
Reassessment frequency depends on how much has changed. A stable household with no major changes can review its checklist every six to twelve months. Anything more disruptive, a renovation, a new tenant, a break-in nearby, or new smart devices installed, warrants an earlier check rather than waiting for the calendar to catch up.
Treat your original written checklist as a living document rather than a one-time report. Update it each time you fix something or add new equipment, so the next reassessment starts from where you actually stand instead of from scratch.
An Editorial Take on What Actually Keeps Homes Safe
The homeowners who stay safest aren’t the ones with the most cameras. They’re the ones who actually flip through their old checklist twice a year instead of letting it collect dust in a drawer. Gadget purchases feel productive, but a $400 camera system aimed at nothing useful does less than a $15 strike-plate screw installed correctly. Buying monitoring before fixing basics is the single most common mistake I see homeowners make, and it’s backwards: equipment should verify that your fundamentals already hold, not compensate for the fact that they don’t. Reassess every six to twelve months, or immediately after anything that changes who has access to your home.
— Derek
Get a Professional Assessment Without Losing Momentum
A free police survey gets you an educational checklist. A professional residential assessment can get you a prioritized plan with someone accountable for making sure it actually gets implemented, often backed by law enforcement and loss-prevention experience most walkthrough programs simply don’t carry.

The visit covers the same ground your DIY checklist just walked you through, perimeter, entry points, electronic systems, interior vulnerabilities, but goes further: an onsite evaluation, a written report ranked by urgency, and oversight as you work through the fixes instead of a one-time list handed to you on the way out. If your municipal police department offers a free survey, that option is still worth using as a starting point. When you’re ready for a deeper look or hands-on help closing the gaps it finds, Hub Investigative Group’s security services team is available to schedule a consultation and walk your property with you.
Checklists and Templates Worth Reviewing Yourself
For homeowners who want to go straight to the primary sources, the Nassau County Sheriff’s Office CPTED checklist is a solid municipal example, and the residential site-survey template from ISRP Group offers a printable, room-by-room format. Both work well as a starting point before or after a professional visit.
Sources
- Residential Physical Security Site Survey Template (ISRP Group)
- The Anatomy of a Home Security Audit: What Pros Look For – Secure Home Mag
- Home Security Assessment: The Free Police Version vs. the Free Sales Version